This application may not function (or look) the same in all browsers, including assistive technologies and is currently best viewed in Internet Explorer 7. Efforts are underway however, to improve cross browser compatibility. Additional info can be obtained at: www.tpwd.state.tx.us/site/policies
If you are having difficulty accessing this information or if you have technical questions about this area of the TPWD web site, please contact us:
By telephone at: 512-389-8070 (Monday through Friday) from 8:00 am to 5:00 pm (central time), or via e-mail at: gis.lab@tpwd.state.tx.us.
Artificial Reefs Interactive Map
Frequently Asked Questions (FAQs)
Access link for the Artificial Reefs Interactive Mapping Application
- What does this application do?
- How can I find information?
- What are Block Group names?
- What are widgets and how do they work?
- How does the Measure button work?
- How does the Identify button work?
- How does the Clear button work?
- Why does the map background turn gray when I zoom in?
- How do I start over?
- Why are there more entries in the Query Results table than on the map?
- Why is the NOAA buoy value underlined in the Query Results table?
- How do I print the map?
- How do I download and print the query results?
- What is the geographic reference system of the application?
- How does the Image Viewer work?
- What if clicking on the link to view documents and images produces no result?
- What if the map doesn't display or print properly?
- What if the site is not working properly?
- What about screen resolution?
- The website seems to be loading slowly. What is wrong?
- Where can I get more information?
- Contact us
What does this application do?
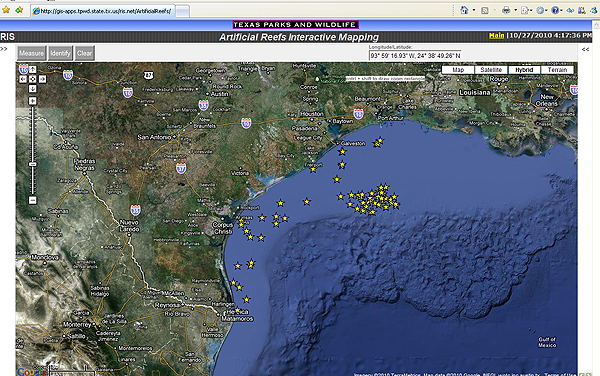
This application is designed to increase awareness and promote use of artificial reef sites in the Gulf of Mexico. As an interactive portal, it allows the public to find artificial reef locations as well as information on the materials within each reef. Users can search for reefs by name, material or location and create a custom map with other geographic layers, like depth and buoy locations.
For users interested in planning fishing or diving trips, the application provides tools for measuring distances, viewing the nearest gulf access location and determining reefs within a certain distance from a user-defined point.
The application also returns tabular information describing features in the map, images of the reef materials, and even video of reefs "in-the-making" (when available). [top of page]
How can I find information?
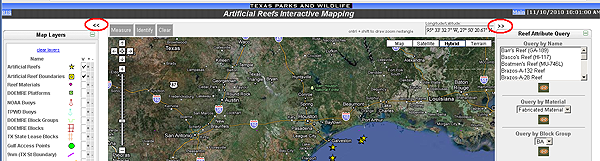
Use the "widgets" on the right panel of the screen to query for information.
- Select a reef from the Query by Name query box and press GO. This query will display the selected reef or reefs on the map.
- Select a material from the Query by Material query box and press GO. This query will return all reefs containing the type of material selected.
- Select a Block Group from the Query by Block Group abbreviated drop-down list and press GO. This query will highlight the block group on the map and mark the reefs located within the block group.
- Enter known coordinates into the Reef Radius Query or click on the map to fill in coordinates. Enter a number from .01 to 10 for radius distance (in nautical miles) and press GO.
- Enter a search term in the Search the Map query box and press GO.
What are the Block Group names?
Block Groups are under the management of the U.S. Bureau of Energy Management Regulation and Enforcement (BOEMRE), formerly the U.S. Mineral Management Service (MMS). The Outer Continental Shelf (OCS) block groups are named for the corresponding area of the Texas coast.

What are widgets and how do they work?
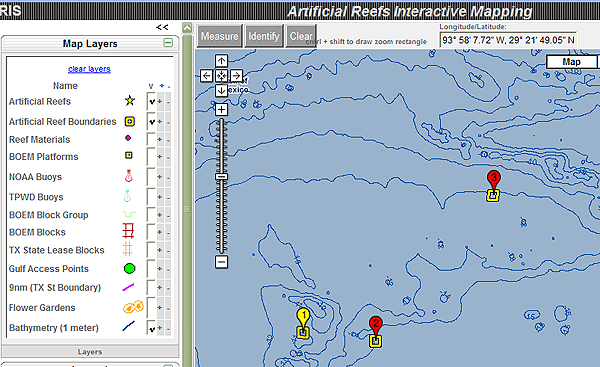
Widgets are movable boxes in the application that allow the user to interact with the map. There are several widgets in the map, including the legends and the query boxes, each with the capability to be dragged and dropped elsewhere on the map. The widgets can be rearranged around the Google™ map, or collapsed and expanded to suit the user's needs. [back to top of page]
How does the Measure button work?
Click the Measure button and then click on the map to mark the starting point. Click on another point and an info balloon opens giving the distance in nautical miles. Additional clicks on the map will calculate the distance from the first point to the last point clicked. The red line created with the measure tool is a graphic and can be cleared from the map using the Clear Graphics option after pressing the Clear button. [top of page]
How does the Identify button work?
Click the Identify button to open a list of identifiable items. Check one or more boxes and then press the GO button. Click a map object that is in the selected category and view the results in the Query Results widget. The point on the map corresponding to the results will be signified with a lower-case, cursive letter 'i.' [top of page]
How does the Clear button work?
Use this button to open a list of items in the map that can be cleared. Check a box to make a selection and then click GO. The Clear button gives the user the option to remove everything or selected items from the map. [top of page]
Why does the map background turn gray when I zoom in?
The gray background signifies that the Google™ map does not have satellite imagery available for that zoom level. When zooming-in, consider changing the background to "Map" instead of "Satellite."
How do I start over?
Press the Refresh button. [top of page]
Why are there more entries in the Query Results table than on the map?
In some cases a query will result in several markers close to the same location. While it appears that there are more query results than map markers, zooming into the map markers should reveal that all the tabular results have a corresponding marker. [top of page]
Why is the NOAA buoy value underlined in the Query Results table?
The NOAA buoy "Value" is a link to the NOAA web page for that buoy.
How do I print the map?
Clicking the print  icon in your browser window will send the map to printer.
You may click the arrows at the top of each panel to collapse the widgets and enlarge the map.
To print a map with legend, collapse only the query widgets (on the right panel) and click the print icon.
How do I download and print the query results?
Open the Query Results print-friendly table by clicking on the print-friendly link. An Export to Excel button is located in the lower left corner of the table.
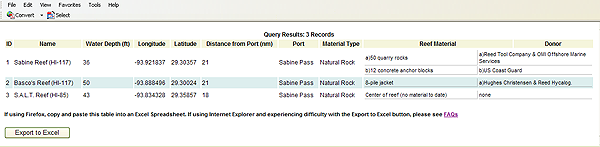
Clicking the Export to Excel button opens a new Excel worksheet and automatically fills in the table information.
Another method of exporting is to expand the print friendly table, press Ctrl + A to select all and press Ctrl + C to copy. Open a new Excel worksheet and press Ctrl + V to paste information and maintain formatting and style. Then save the worksheet to your machine.
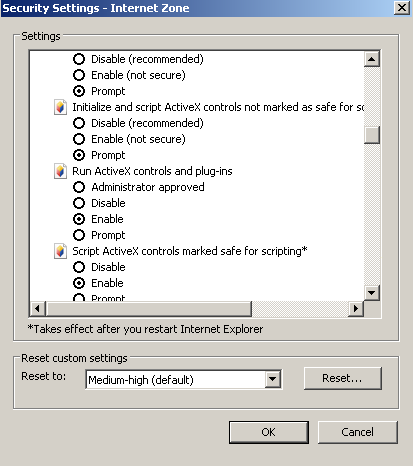
If the Export to Excel button does not launch MS Excel, a likely cause is your browser security settings. You may change these by going to Tools > Internet Options and clicking on the Security tab. Choose the Custom level button and scroll down to the entries related to ActiveX. Change your settings to either Enable or Prompt. Press OK.
What is the geographic reference system of the application?
The datum or geographic reference system defines a fixed reference point for determining locations on the surface of the Earth. The Artificial Reefs Interactive Mapping application is in World Geodetic System 1984 (WGS 84). When clicking on the map, the results in the Latitude/Longitude box will be returned in WGS84. Coordinates returned in the query results, however, are in North American Datum 1983 (NAD 83). [top of page]
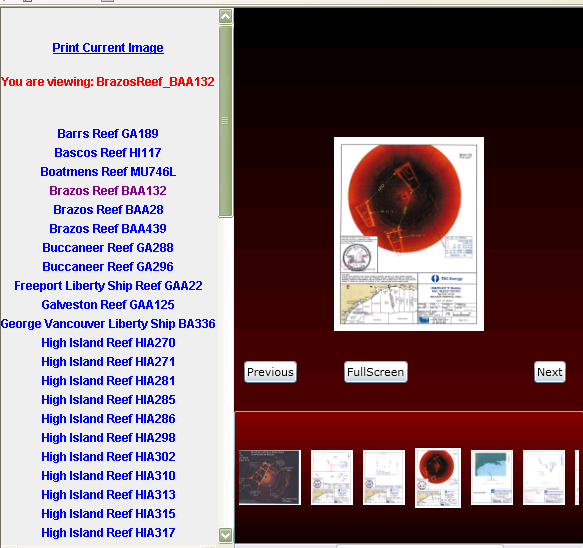
How does the Image Viewer work?
In order to view images and documents, the Silverlight PhotoBrowser will need to be downloaded. The application will prompt you to a link to obtain the free Silverlight PhotoBrowser software. If you have an older version of the Silverlight PhotoBrowswer, you will need to uninstall it before installing the newer version. Use the Control Panel > Add or Remove Programs option on your computer to complete this task.
Reef queries will show markers with informational balloons on the map. Selecting the View Documents and Images link in the Images tab in the balloon will open Silverlight PhotoBrowser in a new window. The reef that is currently being viewed is highlighted in the table of contents and the first image document displays in the main viewer. The remaining image documents appear below the main viewer as thumbnails. Clicking the Full Screen button will enlarge the image loaded in the viewer to fill the window. Clicking the Full Screen button again returns to the entire page. Also, pressing the Escape key will return to the entire page.
The image documents are best viewed as Full Screen and can be easily viewed by pressing the Next or Previous buttons. Images may be printed by selecting the Print Current Images link.
What if clicking on the link to view documents and images produces no result?
If the link worked once and then appears to do nothing, the Silverlight PhotoBrowser could already be open and hidden behind the application window. Drag the application window to the side to locate the Silverlight PhotoBrowser window and make it active. [top of page]
What if the map doesn't display or print properly?
The Internet Explorer browser needs to be set to show background colors. To make this setting, go to: Tools, Internet Options and choose the Advanced tab. Scroll down to Printing and check the Print background colors and images checkbox, and click OK.
In Mozilla Firefox go to: File, Page Setup and choose the Format & Options tab. Check the Print background (colors & images) checkbox, and click OK. [top of page]
What if the site is not working properly?
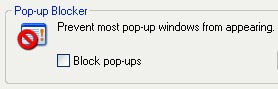
To fully utilize the application, users may need to enable pop-ups.
First, determine if you are using third party software to manage pop-ups or if you are using your internet browser's built-in ability to block pop-ups. If you are using your internet browser's built-in ability to block pop-ups, click Start> Control Panel and then double click Security Center. Under Manage security settings click Internet Options and select the Privacy tab. Under Pop-up Blocker make sure the Block pop-ups box is unchecked.
You may also elect to simply add the TPWD domain (*.tpwd.state.tx.us) to your browser's Allowed Sites under the pop-up blocker settings rather than disabling the blocker all-together. To do this, click on Tools > Pop-Up Blocker > Pop-Up Blocker Settings.
If you are using third party software to manage pop-ups, you will have to add this page to your pop-up blocker's safe/exception/OK list before accessing this application. If your problems continue, please contact your internet provider or your software manufacturer. [top of page]
What about screen resolution?
You may need to change your screen resolution to view the application properly. The application is best viewed at 1280 X 1024 pixels. Please note that you may have to rely on scroll bars to view desired data at resolutions other than 1280 X 1024 pixels.
To change your screen resolution, click Start > Control Panel, and click Display. The Display Properties window will appear. Click the Settings tab. Under Screen Resolution find a slider bar for setting the number of pixels. Slide the bar to 1280 X 1024 and then click Apply. When prompted to apply the setting, click OK. The screen will turn black for a moment. Once the screen resolution changes, click Yes to confirm the change. If you aren't successful in changing the screen resolution, check your computer's help documentation.
The application is best viewed in Internet Explorer (IE) 7. To tell which version of IE you are running open Internet Explorer > Help > About Internet Explorer. The version will display in the About Internet Explorer window. [top of page]
The website seems to be loading slowly. What is wrong?
In most cases nothing is wrong. Please bear in mind that it may take several seconds for the requested map to load. Unlike a static map, the Artificial Reefs application generates a dynamic map on the fly based on the user's query. Although every effort has been made to ensure images load as quickly as possible, variations in your internet service provider's connection rate (baud rate) as well as variations in how fast your computer connects to the internet in general may cause the site to load slowly on your computer. [top of page]
Where can I get more information?
Information about the content in this application will be addressed by Texas Parks & Wildlife Artificial Reef Program staff. Please email your questions or comments to:
ArtificialReefs@tpwd.state.tx.us.
Contact us: If you experience technical difficulties after attempting the suggestions above, you may contact the TPWD GIS Lab at 512-389-8070 Monday through Friday from 8:00 am to 5:00 pm (central time) or via e-mail at gis.lab@tpwd.state.tx.us.