Bird Houses
Autumn is a particularly good time of year to try your hand at building a bird house. Even though a house you build in the fall will not be used by nesting birds until spring, getting it ready early will give it time to lose the odor of paint and newness. It may also serve as a shelter for a bird during the bad weather of winter.

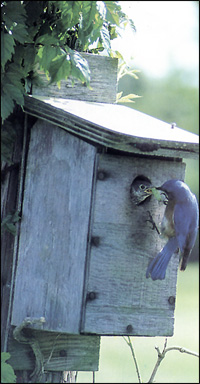
Building and installing customized bird houses provides homes for cavity nesters, such as these bluebirds.
You do not need to be an experienced carpenter to build a satisfactory bird house, but you should know that different types of birds require different size houses and entrance holes. The accompanying chart should help you to select the proper size for the type of bird you hope to attract. Detailed construction plans can be found in almost any book about bird houses, and a trip to the library should provide you with a variety. Select a simple design for your first effort, and when your woodworking skill grows you can attempt the more elaborate types.
Wood is, of course, the best building material and small pieces usually can be inexpensively acquired from the scrap barrels found at most lumber yards. In fact, many lumber companies do not charge for these miscellaneous scraps. Construction sites also are good locations to acquire small pieces of wood that are of no use to the contractor, but be sure to get permission before removing any wood from a construction site. Hollow limbs and saw-mill scraps with the bark still attached make more natural houses, but this type of wood is not always easy to get.
The type of wood used is not of major importance, but cedar, cypress, and redwood probably will withstand the weathering process much better than the more commonly found fir and pine. Metal should be avoided as a construction material because it becomes quite hot when exposed to the sun and can actually roast its occupants. Since overheating is so hazardous to eggs and young birds, even wooden houses should have ventilation holes drilled in the sides under the roof overhang to allow excess heat to escape. The roof should extend far enough to prevent rain from entering these holes and the entrance. Any water that may come in the entrance hole during a hard rain will drain out if small holes are drilled through the floor of the house at the corners.

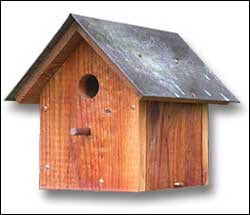
Natural wood birdhouse
Once the house has been built, you are faced with the question of whether to paint it or let it weather naturally. If you decide to paint, paint only the outside surfaces. Choose the more subdued colors, such as brown, gray, or dull green, for those houses being mounted on trees or in the shade. Houses placed on poles in exposed areas, such as martin apartments, should be painted white to help reflect the heat of the sun.
Proper location of your bird house is just as important as its construction. Birds seem to prefer their homes firmly mounted on some type of solid support with the entrance facing south. The accompanying chart also will give you an idea how high the house should be mounted. Houses that are hung from a wire and allowed to twist and swing in the wind are seldom used. Martins, bluebirds, and flycatchers prefer to have their homes out in the open with no trees or buildings too near. Birds also are very territorial and require a certain amount of space around their nesting area. As a result, houses placed too close to each other often cause conflicts, and the birds may abandon them altogether.
Cats and fox squirrels are always a threat to nesting birds and their young, so it may be necessary to add a predator shield to the post or tree on which you mount your bird house. Probably the most effective type of shield is a sheet-metal, cone-shaped device about eighteen inches long. Fasten this shield high enough on the tree or post to prevent the predator from jumping above it to gain a foothold.
After the bird house is mounted and protected, you should not have to do anything else until the middle of March. At that time you should check the house to be sure it is free of mud daubers, bees, mice, and flying squirrels, which sometimes move into a vacant bird house. If you were wise and built your house with either a hinged or sliding roof, front or bottom, this cleaning chore will be quite simple.

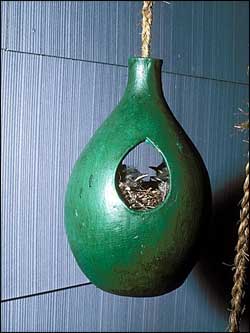
House wren gourd birdhouse
When the birds are through nesting, the bird house should again be cleaned to get rid of any parasites, such as fleas, bird lice, and bird flies, which may have moved in with the first occupants. If you do this, the next resident will not be infested with the parasites left by the previous nester.
Do not put nesting materials inside your bird house to encourage its use. Most birds are very selective and prefer to gather each piece and arrange it to suit themselves. However, if you build a house meant for a woodpecker or owl, put about an inch of sawdust or wood shavings in the bottom for the eggs because these birds do not gather nesting materials. Detailed instructions for building a bluebird house are in the chapter on bluebirds.
Robins, thrashers, and phoebes do not nest in houses but sometimes will use man-made nesting platforms. The accompanying chart will give you the dimensions required by these birds in case you want to try your hand at building one of these nesting platforms.
When spring arrives and your bird houses or platforms are occupied by busy nesters that will provide beauty, hours of entertainment and nature study, and possible bug exterminating services, you will be glad you took the time to build the houses or platforms.
Suggested Specifications for Bird Houses
| Type of Bird | Entrance Diameter in Inches | Entrance Inches above the floor | Bottom Dimension in Inches | Sides Dimension in Inches | Location Height in Feet |
|---|---|---|---|---|---|
| Barn Owl | 6 | 4 | 10 x 18 | 15–18 | 12–18 |
| Bewick wren | 1 | 1–6 | 4 x 4 | 6–8 | 6–10 |
| Bluebird | 1-1/2 | 6 | 5 x 5 | 8 | 5–10 |
| Carolina wren | 1-1/8 | 1–6 | 4 x 4 | 6–8 | 6–10 |
| Chickadee | 1-1/8 | 6–8 | 4 x 4 | 8–10 | 8–20 |
| Crested flycatcher | 2 | 6–8 | 6 x 6 | 8–10 | 6–20 |
| Downy woodpecker | 1-1/4 | 6–8 | 4 x 4 | 8–10 | 6–15 |
| Flicker | 2-1/2 | 14–18 | 7 x 7 | 16–18 | 6–20 |
| Hairy woodpecker | 1-1/2 | 9–12 | 6 x 6 | 12–15 | 12–20 |
| House wren | 7/8 | 1–6 | 4 x 4 | 6–8 | 6–10 |
| Nuthatch | 1-1/4 | 6–8 | 4 x 4 | 8–10 | 12–20 |
| Redheaded woodpecker | 2 | 9–12 | 6 x 6 | 12–15 | 12–20 |
| Screech owl | 3 | 12 | 8 x 8 | 12–15 | 10–20 |
| Sparrow hawk | 3 | 9–12 | 8 x 8 | 12–15 | 10–30 |
| Titmouse | 1-1/4 | 6–8 | 4 x 4 | 8–10 | 6–15 |
| Tree swallow | 1-1/2 | 1–5 | 6 x 6 | 6 | 10–15 |
- Birds Using Apartment or Colony Houses with Many Entrances
- Martin: Entrance 2-1/2 inches, 1 inch above floor: rooms 6 x 6 inches and 6 inches deep; located 15–20 feet from ground. Should have at least 10 rooms and be placed in an open area.
- Birds Requiring One or More Sides of House Open
- Barn Swallow and Phoebe: Floor
6 x 6 inches, 6 inches deep; 5 feet from ground.
Robin: Floor 6 x 8 inches, 8 inches deep; 6–15 feet from ground. - Birds That Require a Platform with All Sides Open
- Song Sparrow and Brown Thrasher: 6 x 6 inches; 5 feet from ground.
For more information about bird houses,
download TPWD's "Providing
for Backyard Wildlife"  (PDF 896.1 KB) publication.
Ilo
Hiller
1989 – Bird Houses: Introducing Birds to Young
Naturalists. The Louise
Lindsey Merrick Texas Environment
Series, No. 9, pp. 15-17.
Texas A&M University
Press, College Station.