Snowflakes
Like beautiful crystal ornaments, winter creates its icy jewels—the snowflakes. These delicate, artistic designs form when water vapor (water not in a liquid state) in clouds comes in contact with microscopic, airborne particles of dust, soil, rock, or volcanic ash at temperatures below freezing. Upon contact, the water vapor sublimates (changes into a solid state without becoming liquid first) to form a tiny ice crystal. As more water vapor freezes around it, the original crystal forms branches that grow into a flat, six-sided snowflake. The temperature of the water vapor must be twenty degrees or lower before a snowflake will form.
Even though all snowflakes have six sides or points, no two look exactly alike. Shape and size depend upon the temperature and amount of moisture in the air. The more solid patterns form slowly in clouds high above the earth where there is less moisture and the temperatures are colder. In warmer, moisture-filled clouds, the crystals grow more quickly and form lacy, feathery branches. Ideal temperatures for snowflake formation range between ten degrees above and four degrees below zero.

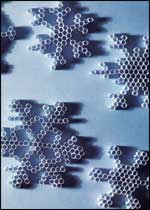
Snowflakes made from soda straws
Not all of the snowflakes that form in the cold atmosphere of a cloud fall on the earth as snow. If the air near the ground is too warm, the snowflake melts on the way down and becomes a raindrop, and we never know it was once an icy crystal. Even when air temperatures become cold enough for falling snowflakes to make their trip to the earth, the frozen crystal still may melt upon touching the ground if the ground temperature is too warm. As a solid, the ground cools more slowly than the air and can be several degrees warmer. This explains why snow often covers the cold metal surfaces of a parked car or garbage can lid yet does not stay on the ground. Once the ground temperature becomes cold enough, snowflakes can quickly cover it with a blanket of white.
Even those of you who live in a part of the state where snow rarely, if ever, falls might like to design and make snowflake decorations for your room. These artificial snowflakes can be attached to a mobile, hung from the ceiling or a light fixture, suspended in front of a window, or fastened to a background and hung on the wall as a picture. To make these artificial snowflakes, you will need a piece of foil, a box of plastic straws, a pair of scissors, craft blue, and, of course, your imagination.
The straws in these snowflakes are white with blue stripes, but you may prefer to use solid white. Cut them in pieces about one-fourth inch in length. Use a ballpoint pen to mark the cutting lines on the straws so the pieces will be more or less the same size. The number of straws needed for each snowflake depends upon the size and design, but you should cut up at least eight straws at the beginning. Draw three intersecting lines about five inches long on the piece of foil to form the six equally spaced points of the snowflake. They serve as a pattern to keep the snowflake design even. A small circle of tape with its sticky side out will help anchor the snowflake to the center of the foil pattern.
Now you are ready to glue the sides of the straws together in whatever hexagon design you want. (While speaking of glue, I should mention that not all glues stick to the slick surface of plastic straws. In fact, I tried three different kinds before finding one that would work. The snowflakes fell apart when thin, white glue and nontoxic plastic model glue were used. A thick, white, all-purpose craft glue called “Tacky” glue held best. This brand or a similar one should be available in most hobby or craft stores. Super glues will probably work, but I have not recommended them because I do not want to be responsible for your fingers’ being glued together.) Allow the snowflakes to dry overnight before attempting to handle them. If you are messy while gluing them together, they may be stuck to the foil. To remove them, carefully slip a table knife between the snowflake and the foil.
The finished snowflakes will be fragile, but if you handle them carefully, you should have some nice decorations for your room this winter.
Ilo
Hiller
1983 Crystals. Young
Naturalist. The
Louise Lindsey Merrick Texas
Environment Series, No.
6, pp. 110-113. Texas A&M
University Press, College
Station.