Algae Pressing
Green scum floating on the surface of a stagnant pond, the slimy growth that causes your foot to slip off the rocks as you try to cross a shallow creek, or the slick, green coating that forms on the inside of an aquarium may come to mind when you hear the word algae. True, these growths are types of freshwater algae, but not all algae are green, slimy, or limited to fresh water.
Many species of algae grow in salt water, and they range in size from microscopic one-celled plants to massive, complex specimens several feet long. Their colors include various shades of green, red, brown, and golden-brown. If you have been around salt water, you probably have seen several different kinds of marine algae, but you may not have known them by that name. They commonly are called seaweeds. Unlike the sea grasses, which many people incorrectly call seaweeds, algae have no roots, stems, leaves, flowers, or seeds.
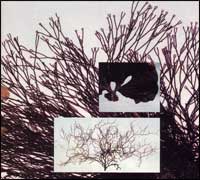
Occasionally small marine creatures living within the branching parts of algae are pressed and dried along with the plant. Instead of roots, algae have holdfasts that anchor them to rocks, shells, wood, bottles, and other such surfaces. Color may vary within a single plant. Specimens have been found that range from dark green to a brownish red.
Instead of roots, most algae have holdfasts that anchor them to rocks, shells, wood, bottles, and other such surfaces. Those that become detached join the free-floating species. Since algae get all their nutrients directly from the water, they may continue to live in this suspended state until they are washed ashore. Some, such as Sargassum, have air-filled bladders that aid them in floating.
Creatures of the sea depend on algae in their food chain the way land animals depend on grass and other vegetation. Those that eat the algae later become food for the flesh-eaters. In addition to food, algae also provide shelter for many marine animals. An interdependent colony of different species that feed on the plant or each other lives and reproduces within the confines of a single clump of floating Sargassum. It is their whole universe.
Algae also have commercial uses. The Japanese have been cultivating some of the edible species for hundreds of years. Seaweeds are an important part of their diet. Derivatives of algae are used in food, cosmetics, medicines, paper, textiles, varnishes, paint thinners, cement, ceramics, and many other products manufactured in the United States. Whenever you eat ice cream or pudding, you probably are eating some algae, since one of the derivatives is a smoothener used in these foods.
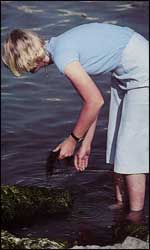
When you gather algae for pressing, it is best to collect specimens from beneath the water�s surface. Exposure to the sun and air quickly dries the plants and causes them to deteriorate. If you follow the simple steps for pressing algae, taking time to arrange the specimens artistically with the help of tweezers or a squeeze bottle of water, you should be rewarded with farmable algae when the drying process is done.
Since the days of the Vikings, algae have been used as fertilizer. Records indicate the early Romans and Spaniards used the plants to enrich their soils. Today, seaweeds washed ashore often are gathered by coastal residents, washed thoroughly to remove the salt, and used as a rich mulch for flower beds and gardens.
Next time you visit the beach, you might like to see how many different kinds of algae you can find. The specimens can be pressed and kept in a notebook as a botanical collection; however, with a little extra time and effort, you can create artistic pressings suitable for framing and display. The first step is to acquire the necessary materials—a plant press, herbarium paper or scientific paper, newspapers, cardboard, nylon cloth, a shallow pan, tweezers, a squeeze bottle, and, of course, the algae.
Plant Press
There are many different kinds of plant presses. The simplest one can be made merely by strapping two varnished boards together with webbed, beltlike straps.
Another, more elaborate version of this simple press consists of two pieces of varnished wood about twelve inches wide, eighteen inches long, and three-eights of an inch or more thick; two long, threaded rods about three-eights of an inch in diameter; and two hexagon-shaped nuts, four washers, and two wing nuts to fit the rods.
A hole large enough for the rod to pass through is drilled through the two pieces of wood about 1 ¼ inches in from either end and centered. The rods are inserted through the holes and secured at the bottom with washers and hex nuts. The other two washers and wing nuts are added to the rods on top. After the specimens to be pressed are inserted between the boards, the wing nuts are tightened down so the two pieces of wood are held firmly together. Standing on the boards while tightening the wing nuts, or fastening the straps on the simpler model, ensures a tight press.
Do not attempt to press
algae between books. The
water content of the plants
will ruin the books, and
the algae probably will
mildew before they dry.
Paper
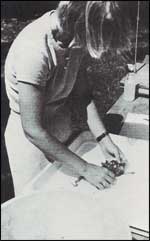
The paper on which algae are pressed should have a 100 percent rag content so it will not yellow with time. Herbarium paper meets this specification and can be purchased from any biological supply house. Stores with a good selection of school supplies may sell a product called scientific paper or botony paper that also is suitable for pressing algae.
Another paper that gives a more artistic pressing is Chiri; however, it definitely is not for the beginner. Once it becomes wet, it tears easily and probably will come apart in your hands. When you get more experienced at algae pressing and want to give this special art paper a try, slip a piece of glass beneath the paper and algae before lifting them from the water. Careful handling in this manner may prevent the expensive paper from tearing.
Newspapers
Use only old newspapers to absorb the water since the ink on new newspapers is not completely dry and may transfer to your herbarium paper during the pressing process. Also, make sure no colored inks appear on the newspapers you select because these colors sometimes bleed onto the finished pressing.
Cardboard
Cardboard is one of the layering materials used in your plant press. Two or three pieces of corrugated cardboard are placed between the wood and the plant pressings. Additional pieces are layered into the stack after every third or fourth plant.
Nylon Cloth
A piece of white nylon cloth placed directly over the plant helps protect it and keep it clean during the pressing process. Nylon, which can be purchased in most fabric stores, dries quickly and aids in the transfer of moisture from the plant to the newspaper. If you happen to have some old parachute material, it is excellent for this purpose.
Shallow Pan
Any pan or dish large enough for arranging the floating seaweed and deep enough to hold an inch or two of water can be used. A pan with a white bottom clearly defines the structure and shape of the plant and allows quite a bit of artistic arranging before the paper is slipped into the water and under the plant.
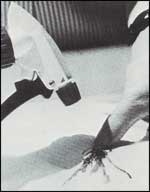
Tweezers
When you are arranging the plant on the pressing paper, tweezers are quite helpful for separating the branching parts and moving them to the proper angle. Do not scratch the surface of the wet paper with the tweezers.
Squeeze Bottle
A squeeze bottle full of
water is helpful for arranging
algae in artistic shapes.
Once the plant has been
lifted from the pan with
the paper, water from the
squeeze bottle can be directed
onto the various parts,
causing them to separate
or flow in a desired direction.
This technique works well
with the more fragile algae,
which are hard to handle.
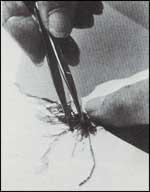
Algae
Gather the amount of algae you intend to press during the early morning hours while temperatures are still cool. A small bucket containing a bit of salt water should hold all the different species you fin d. A plastic bag can be used for collecting, but if algae are allowed to remain in the bag in the sun for too long, they will be cooked or damaged by the heat.
Since the rocks on which algae grow can be quite slick, be careful when you are climbing around. It is wise to crouch down and use your hands to help as you scramble from rock to rock. Wearing tennis shoes will help protect your feet from sharp shells and other debris in the water or on the rocks.
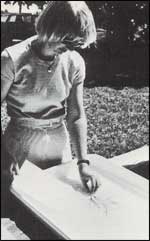
Once the algae are gathered, you are ready to start pressing. Get all your materials together. Take a piece of seaweed from your collecting bucket and place it in the pan of water. Separate it so its various branching parts lie flat. Don’t try to press a clumped mass because it won’t dry properly. If you cannot get the plant to lie flat, clip off some of the excess parts and try again.
When you are satisfied with the way it is arranged, slip a piece of herbarium paper beneath the plant, lift it carefully from the pan, and allow the water to drain off. If additional arranging is necessary, use the squeeze bottle of water or the tweezers. Lay the paper and plant on a piece of folded newspaper, several pages thick. Cover the plant with a piece of nylon and then add another layer of folded newspaper. Place the sandwiched plant in the press on a base of several pieces of cardboard and folded newspapers.
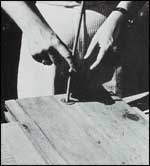
Now prepare another pressing, layering it in the same way. Stack the second newspaper-sandwiched plant on top of the first. When three or four algae have been placed in the press, put another piece of cardboard on the stack. Three or four more algae can be added before another piece of cardboard is necessary. Continue layering in this manner until all of the algae you gathered are prepared or until the stack reaches the limits of your press. More newspaper and cardboard finish off the stack as it was begun. Tighten the boards together and leave the press alone for twenty-four hours.
After this time passes,
the newspaper must be changed
to prevent mildew. Open
the press and remove the
stack of pressing material.
Working in reverse, take
off each layer. Put fresh
cardboard and a few layers
of newspapers in the press
as before. Replace the wet
pieces of newspaper sandwiching
the first specimen in the
stack. Handle the herbarium
paper, seaweed, and nylon
covering carefully so the
plant is not disturbed.
Work your way through the
stack until all of the wet
newspapers are replaced
and the plants are back
in the press. Top the stack
off with more newspapers
and cardboard and tighten
the press again. Two days
later the newspapers must
be changed again. Afterwards
the algae can be left in
the press for a week or
more. At the end of that
time, they should be dried
thoroughly. Since the algin
in freshly collected algae
dries somewhat like glue,
the majority of the pressed
plants will be stuck to
the herbarium paper. However
the dried specimens can
be dislodged if they are
not handled carefully.
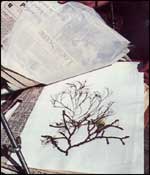
At this point the pressed algae can be framed and hung o the wall, or the individual specimens can be placed between protective plastic sheets and kept in a notebook.
Harsh light causes the color in algae to deteriorate, so don’t hang your pressings in direct sunlight. Greens fade the fastest and dark reddish specimens may bleach to a deep pink. Those protected from light in a notebook or folder should retain their coloring for years.
Ilo
Hiller
1983 Algae Pressing. Young
Naturalist. The Louise
Lindsey Merrick Texas Environment
Series, No. 6, pp. 94-97.
Texas A&M University
Press, College Station.
Editor’s Note: The pressed algae that appear in these pictures are part of a collection belonging to James Bowman and Dave Jensen, biologists with the Department of Water Resources, District 12. The pressed algae in this collection are used for identification purposes by the biologists and were prepared by James Bowman, Dave Jensen, and Dinah Bowman. For additional information on algae pressings or the framing of artistic algae pressings, contact Dinah Bowman through her studio and gallery at 312 Fifth Avenue, Portland, Texas 78374.